快速集成指南
注意事项
license文件(DFLicense)用以控制程序的包名和有效时间(时间范围可以直接查看文件内容获取),请用户一定要确认程序的包名是否与 license 绑定的包名一致,请确保程序运行设备的系统时间在 license 的有效时间内。
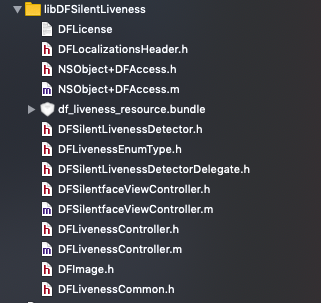
SDK 目录结构
将SDK集成到开发环境
使用 SDK 前,首先需要将其集成到您的开发环境中。
项目运行环境需要 iOS9.0 及以上,支持机型 iPhone 6及以上。下文将说明开发中需要的详细操作。
配置开发环境
1. 导入SDK包
将libDFSilentLiveness文件夹(包含 libDFSilentLivenessDetector.a、DFLicense、df_liveness_resource.bundle、.h、.m等) copy 一份到项目工程目录下,拖拽到 xcode 打开的工程中,勾选 copy,点击 Finish 按钮。
注:本 SDK 不支持 CocoaPods 的方式导入。

2. 编译选项设置
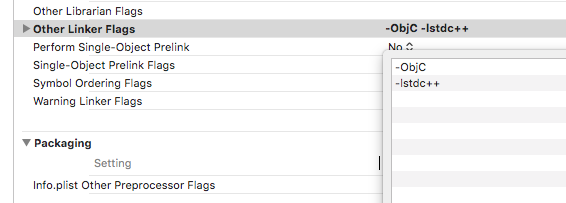
2.1 需要添加 Xcode 链接器参数:-ObjC 和 -lstdc++
- 添加 -ObjC 参数后链接器可以把静态库中所有的 Objective-C 类和分类都加载到最后的可执行文件中。
- 添加 -lstdc++ 参数是由于我们的静态库中需要 c++ 标准库支持。
- 添加方法: TARGETS -> Build Settings -> Linking -> Other Linker Flags 中添加 -lstdc++ 和 -ObjC 。
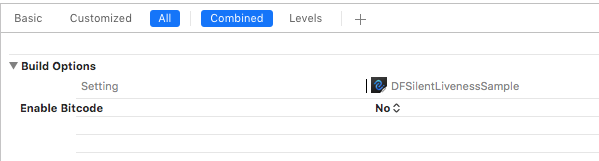
2.2 需要手动关闭Bitcode。
步骤:
TARGETS -> BuildSettings -> Enable Bitcode 设置为 NO。
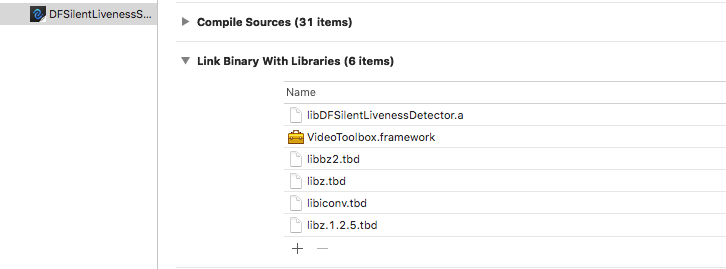
3. 添加相关引用库。
- 步骤:
TARGETS ->Build Phases中添加相关引用库
4. 在Xcode上调试iOS9以上系统时,调用相机功能时,在info.plist文件下添加隐私权限。
 <key>NSCameraUsageDescription</key>
 <string>cameraDesciption</string>
 <key> NSPhotoLibraryUsageDescription </key>
 <string>cameraDesciption</string>
开始检测
DFSilentfaceViewController调用流程
DFSilentfaceViewController 是我们提供的活体检测SDK示例。可以根据界面提示,设置检测阈值、检测组数等操作。设置完成后,就可以开始进行检测。
详细说明如下:
遵守 DFSilentLivenessDetectorDelegate 协议
@interface ViewController () <DFSilentLivenessDetectorDelegate>获取资源路径
NSString *strResourcesBundlePath = [[NSBundle mainBundle] pathForResource:@"df_liveness_resource" ofType:@"bundle"];获取授权文件路径
NSString *licensePath = [[NSBundle mainBundle] pathForResource:@"DFLicense" ofType:@""];初始化检测视图控制器
DFSilentfaceViewController *livenessVC = [[DFSilentfaceViewController alloc] initWithResourcesBundlePath:strResourcesBundlePath licensePath:licensePath];相关参数设置
 // 设置检测阈值、丢失值和检测组数
 - (void)setThreshold:(float)threshold groupCount:(NSInteger)groupCount;
// 设置回调代理和线程 - (void)setDelegate:(id <DFSilentLivenessDetectorDelegate>)delegate callBackQueue:(dispatch_queue_t)queue;Present 检测视图控制器
 UINavigationController *navigationController = [[UINavigationController alloc] initWithRootViewController:livenessVC];
 [navigationController setNavigationBarHidden:YES];
 [self presentViewController:navigationController animated:YES completion:nil];
实现 DFSilentLivenessDetectorDelegate 中的方法
 - (void)livenessDidStart;
 {
         // 开始检测时会回调此方法
 }
// 检测成功的回调,data为加密后的数据,arrDFImage为DFImage对象的数组,successScore(废弃)最后检测成功帧的置信度 - (void)livenessDidSuccessfulGetData:(NSData *)data dfImages:(NSArray *)arrDFImage successScore:(float)successScore; { }// 检测失败的回调,iErrorType为失败的错误类型 - (void)livenessDidFailWithErrorType:(LivefaceErrorType)iErrorType { }// 检测取消的回调 - (void)livenessDidCancel { }
DFLivenessController 调用流程
DFLivenessController是对DFSilentfaceViewController的一层封装,已经写好了一部分内部逻辑。如果没有内部定制化的要求,可以直接使用DFLivenessController。
遵守 DFLivenessDetectorDelegate 协议
@interface ViewController () <DFLivenessDelegate>初始化参数设置
 // autoAntiHack:自动上传活体加密文件做antiHack
 DFLivenessController是以json串作为初始化参数的
 NSDictionary *dictJson = @{@"groupCount": @(2),
                             @"threshold": @(0.8),
                          @"autoAntiHack": @(YES)};
 //转化为json字符串
 NSString *strJson = [[NSString alloc] initWithData:[NSJSONSerialization dataWithJSONObject:dictJson options:NSJSONWritingPrettyPrinted error:nil] encoding:NSUTF8StringEncoding];
 DFLivenessController * livenessVC = [[DFLivenessController alloc] init];
 [livenessVC setJsonCommand:strJson];
Present 检测视图控制器
 UINavigationController *navigationController = [[UINavigationController alloc] initWithRootViewController:livenessVC];
 [navigationController setNavigationBarHidden:YES];
 [self presentViewController:navigationController animated:YES completion:^{
         //如果需要自动开始,而不是按钮触发,调用下面这行代码
         //[livenessVC restart];
 }];
实现 DFLivenessDelegate 中的方法
 // 检测已经开始的回调
 - (void)livenessDidStart;
// 检测成功回调方法 当设置 autoAntiHack 为 NO 时回调 // 返回加密二进制数据、图片、最后检测成功帧的置信度(successScore 废弃) - (void)livenessDidSuccessfulGetData:(NSData *)encryTarData dfImages:(NSArray *)arrDFImage successScore:(float)successScore { // 调用防hack接口,上传encryTarData,获取antiHack结果 }// 检测成功回调方法 当设置 autoAntiHack 为 YES 时回调 // 返回加密二进制数据、图片、最后检测成功帧的置信度(successScore 废弃)、是否是hack用户 - (void)livenessDidSuccessfulGetData:(NSData *)encryTarData dfImages:(NSArray *)arrDFImage successScore:(float)successScore isHack:(BOOL)isHack { // isHack 是上传encryTarData后的antiHack结果 // 上传参看DEMO }// 检测失败回调方法 - (void)livenessDidFailWithType:(DFLivenessError)iErrorType;// 取消检测指令回调方法 - (void)livenessDidCancel;